Enable Suspect Commits & Stack Trace Linking
Learn how to integrate your source code with Sentry, so that Sentry can track commits and surface suspect commits and suggested assignees to help you resolve issues faster.
This feature is only applicable for error issues with debug information files, excluding source maps. Other categories of issues (such as performance issues or replay issues) do not support this feature.
Sentry uses commit metadata from your source code repositories to help you resolve your issues faster. This is done by suggesting suspect commits that might have introduced an error right in your Issue Details page. It also allows Sentry to display suggested assignees — the list of the authors of those commits — and suggest their assignment to resolve the issue.
Now that you've created a release, you can tell Sentry which commits are associated with this latest version of your code; this is called commit tracking.
Use Sentry's GitHub integration to link your source code repository to your Sentry project. This enables Sentry to use commit metadata to help you streamline issue triaging.
To integrate GitHub with your Sentry org, follow the GitHub Integration Install instructions. Be sure to give the integration access to the appropriate repository — in this case, the
frontend-tutorialrepo you forked.After you've added the integration, you should be redirected to a page showing your GitHub repositories in Sentry. Verify that the right repos have been added.
Go to the "Code Mappings" tab.
Click "Add Code Mapping".
Fill out the information requested to add a code mapping between your Sentry project and the
frontend-tutorialrepository'smainormasterbranch. Tell Sentry that your components live in thesrc/directory: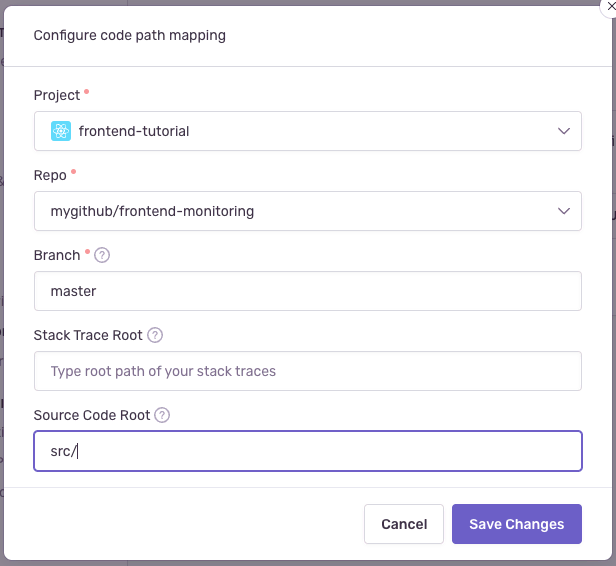

Follow along with the interactive demo below to see how to integrate your GitHub account and repository.
A release is a version of your code deployed to an environment. See the Releases documentation to learn more. Sentry uses releases to match up your source maps and source code. Releases can also be used to enable Sentry's Suspect Commits feature.
The Sentry webpack plugin can automatically configure release information and send it to Sentry when you create a new build of your project. Let's enable this feature.
Go back to your
frontend-tutorialproject and stop it withCtrl + C.Create a Sentry auth token:
.envCopiedSENTRY_AUTH_TOKEN=sntrys_YOUR_TOKEN_HEREYou'll need to pass your auth token to your build command later on. We recommend storing it inside an environment variable. Auth tokens should always stay secret, so avoid storing yours inside your version control.
To start associating commits and releases, add the following lines of code to
webpack.config.jsin your Sentry webpack plugin config:webpack.config.jsCopiedsentryWebpackPlugin({ org: "example-org", project: "example-project", authToken: process.env.SENTRY_AUTH_TOKEN, // Enable automatically creating releases and associating commits release: { create: true, setCommits: { auto: true, }, }, }),Save the file.
Now that releases are set up to track commits, tweak the error and create a new commit to verify that this works.
In
src/components/App.js, edit line 97. This will make sure Sentry recognizes a new error that it can associate with the release you will create.src/components/App.jsCopiedthis.myCodeIsMorePerfect();Save the file.
Add all your changes to git with:
Copiedgit commit -am 'Added a new error and some other stuff' git pushCreate another production build. During this process, the webpack plugin will create a new release and associate your commit to that release.
Copiednpm run buildRun your production build:
Copiednpx serve buildCreate a new issue for Sentry by generating another error in your app. Open the URL your app is running in, add products to your cart, and click "Checkout". You should soon see a new issue in Sentry.
Now suspect commits and suggested assignees should start appearing on the Issue Details page. Sentry determines these using files observed in the stack trace, authors of those files, and ownership rules.
Check your email for the alert about the new error. Notice that a new "Suspect Commits" section has been added to the email.
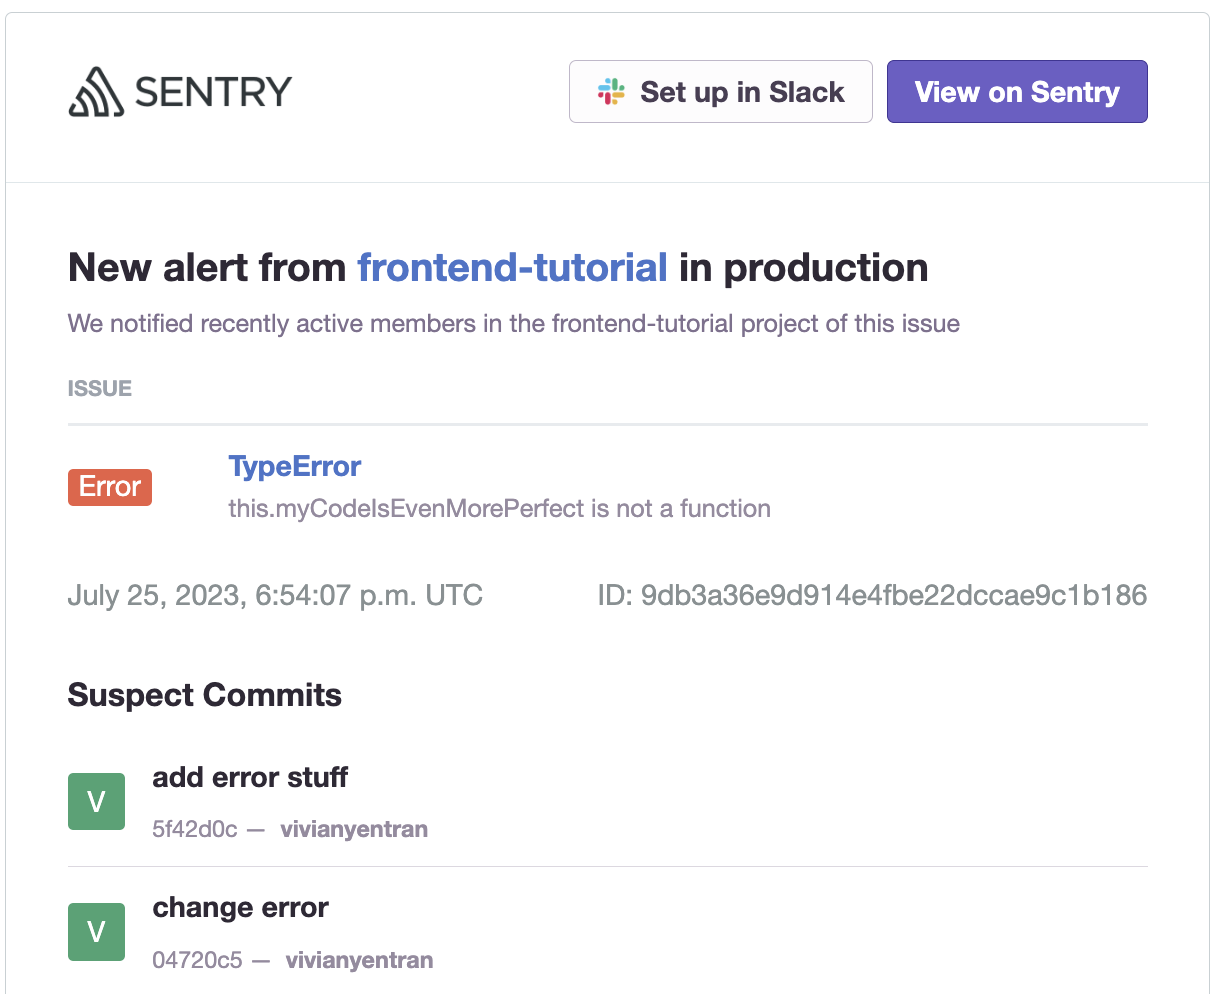
Click "View on Sentry" to open the Issue Details page.
Verify that the "Suspect Commits" section now points to the suspected commit that likely introduced the error. You can click on the commit link to see the actual commit details on GitHub.
In the right side panel, click under "Assigned To" to open the dropdown to see suggested assignees. You'll see that the author of the suspect commit is listed as a suggested assignee for this issue.
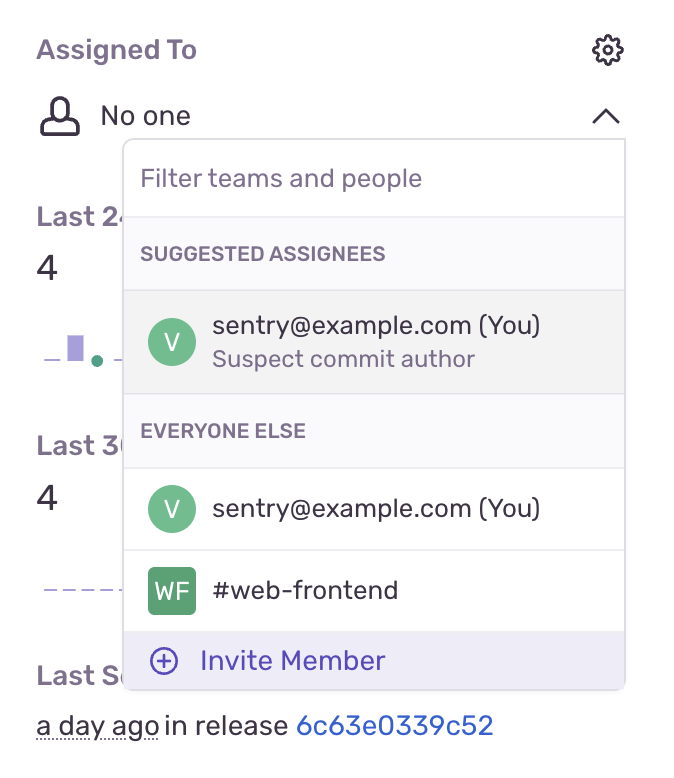
You can assign the issue to the suggested assignee by clicking on their email. Alternatively, you can choose to assign the issue to other users or teams associated with the project.


The interactive demo below shows how to view suspect commits and suggested assignees for an issue.
Verify that releases have been configured correctly.
In the main panel's "Tags" section, find the
releasetag and hover over the release ID link. You should see in the popup that the release now contains commit data.Click on the release ID link to open the Release Details page.
Select the "Commits" tab. Notice that release now contains the associated list of commits.
The interactive demo below shows how to view commits associated with the release.
Stack trace links allows you to jump from a stack trace in sentry.io to the corresponding file in your source code provider. This is done by matching the file path in the stack trace to the file path in your source code provider.
Go to the Issue Details page for the error you generated in the previous step.
Click "Tell us where your source code is" so Sentry can verify your code mapping.
In the popup, verify or enter the file path and the correct GitHub URL.
Click "Save". You should now see that the stack trace is linked to the code file in GitHub.
Click "Open this line in GitHub" to go directly to the line of code causing the error.
The interactive demo below walks through how to set up and view stack trace links in the UI.
With GitHub integrated and your releases linked to your sources and commits, you can use Sentry's suspect commits, suggested assignees, and stack trace links to help you triage and resolve issues faster. To learn more about how to get the most value out of releases and integrations, check out these resources:
You should now have Sentry's error monitoring set up with source maps and suspect commits working.
On top of error monitoring, Sentry offers other features to help you detect and fix problems with your apps, like:
- Session Replay to view a a video-like reproduction of your user sessions when errors occur.
- Insights to track application performance and errors across services.
- Profiling to get deeper level of visibility on top of traditional tracing.
As well as Codecov to give you automated code coverage reports as part of your CI/CD.
Our documentation is open source and available on GitHub. Your contributions are welcome, whether fixing a typo (drat!) or suggesting an update ("yeah, this would be better").